Recently I’ve added some Raspberry Pi 4 nodes to the Kubernetes cluster I’m
running at home.
The overall support of ARM inside of the container ecosystem improved a lot
over the last years with more container images made available for the
armv7 and the arm64 architectures.
But what about my own container images? I’m running some homemade
containerized applications on top of this cluster and I would like to have them
scheduled both on the x64_64 nodes and on the ARM ones.
There are many ways to build ARM container images. You can go from something as
simple, and tedious, as performing manual builds on a real/emulated ARM machines
or you can do something more structured like using
this GitHub Action,
relying on something like the
Open Build Service,…
My personal desire was to leverage my mixed Kubernetes cluster and
perform the image building right on top of it.
Implementing this design has been a great learning experience, something IMHO
worth to be shared with others.
The journey has been too long to fit into a single blog post; I’ll split my
story into multiple posts.
Our journey begins with the challenge of building a container image from
within a container.
Image building
The most known way to build a container image is by using docker build.
I didn’t want to use docker to build my images because the build process
will take place right on top of Kubernetes, meaning the build will happen in a
containerized way.
Some people are using docker as the container runtime of their Kubernetes
clusters and are leveraging that to mount the docker socket inside of some
of their containers. Once the docker socket is mounted, the containerized
application has full access to the docker daemon that is running on the host.
From there it’s game over the container can perform actions such as building
new images.
I’m a strong opponent of this approach because it’s highly insecure. Moreover
I’m not using docker as container runtime and I guess many people will stop
doing that in the near future once dockershim gets deprecated.
Translated: the majority of the future Kubernetes cluster will either have
containerd, CRI-O or something similar instead of docker - hence bye bye
to the docker socket hack.
There are however many other ways to build containers that are not based on
docker build.
If you do a quick internet search about containerized image building you will
definitely find kaniko.
kaniko does exactly what I want: it performs containerized builds without using
the docker daemon. There are also many examples covering image building on top
of Kubernetes with kaniko. Unfortunately, at the time of writing, kaniko
supports only the x86_64 architecture.
Our chances are not over yet because there’s another container building tool
that can help us: buildah.
Buildah is part of the “libpod ecosystem”, which includes projects such as
podman, skopeo
and CRI-O. All these tools are available for multiple
architectures: x86_64, aarch64 (aka ARM64), s390x and ppc64le.
Running buildah containerized
Buildah can build container images starting from a Dockerfile or in a
more interactive way. All of that without requiring any privileged daemon
running on your system.
During the last years the buildah developers spent quite some efforts to support the use
case of “containerized buildah”.
This
is just the most recent blog post that discusses this scenario in depth.
Upstream has even a Dockerfile that can be used to create a buildah container
image. This can be found here.
I took this Dockerfile, made some minor adjustments and uploaded it
to this project
on the Open Build Service. As a result I got a multi architecture container
image that can be pulled from registry.opensuse.org/home/flavio_castelli/containers/containers/buildahimage:latest.
The storage driver
As some container veterans probably know, there are several types of storage
drivers that can be used by container engines.
In case you’re not familiar with this topic you can read these great
documentation pages from Docker:
Note well: despite being written for the docker container engine, this applies
also to podman, buildah, CRI-O and containerd.
The most portable and performant storage driver is the overlay one.
This is the one we want to use when running buildah containerized.
The overlay driver can be used in safe way even inside of a container by
leveraging fuse-overlay; this
is described by the buildah blog post I linked above.
However, using the overlay storage driver inside of a container requires
Fuse to be enabled on the host and, most important of all, it requires the
/dev/fuse device to be accessible by the container.
The share operation cannot be done by simply mounting /dev/fuse as a volume
because there are some extra “low level” steps that must be done (like properly
instructing the cgroup device hierarchy).
These extra steps are automatically handled by docker and podman via the
--device flag of the run command:
$ podman run --rm -ti --device /dev/fuse buildahimage bash
This problem will need to be solved in a different way when buildah is run
on top of Kubernetes.
Kubernetes device plugin
Special host devices can be shared with containers running inside of a
Kubernetes POD by using a recent feature called
Kubernetes device plugins.
Quoting the upstream documentation:
Kubernetes provides a device plugin framework that you can use to advertise system hardware resources to the Kubelet .
Instead of customizing the code for Kubernetes itself, vendors can implement a device plugin that you deploy either manually or as a DaemonSet . The targeted devices include GPUs, high-performance NICs, FPGAs, InfiniBand adapters, and other similar computing resources that may require vendor specific initialization and setup.
This Kubernetes feature is commonly used to allow containerized machine learning
workloads to access the GPU cards available on the host.
Luckily someone wrote a Kubernetes device plugin that exposes /dev/fuse to
Kubernetes-managed containers:
fuse-device-plugin.
I’ve forked the project, made
some minor fixes to its Dockerfile and created a GitHub action to build
the container image for amd64, armv7 and amd64 (a PR is coming soon).
The images are available on the Docker Hub as: flavio/fuse-device-plugin.
The fuse-device-plugin has to be deployed as a Kubernetes DaemonSet via this
yaml file:
apiVersion: apps/v1
kind: DaemonSet
metadata:
  name: fuse-device-plugin-daemonset
  namespace: kube-system
spec:
  selector:
    matchLabels:
      name: fuse-device-plugin-ds
  template:
    metadata:
      labels:
        name: fuse-device-plugin-ds
    spec:
      hostNetwork: true
      containers:
      - image: flavio/fuse-device-plugin:latest
        name: fuse-device-plugin-ctr
        securityContext:
          allowPrivilegeEscalation: false
          capabilities:
            drop: ["ALL"]
        volumeMounts:
          - name: device-plugin
            mountPath: /var/lib/kubelet/device-plugins
      volumes:
        - name: device-plugin
          hostPath:
            path: /var/lib/kubelet/device-plugins
This is basically this file,
with the flavio/fuse-device-plugin image being used instead of the
original one (which is built only for x86_64).
Once the DaemonSet PODs are running on all the nodes of the cluster, we can see
the Fuse device being exposed as an allocatable resource identified by the
github.com/fuse key:
$ kubectl get nodes -o=jsonpath=$'{range .items[*]}{.metadata.name}: {.status.allocatable}\n{end}'
jam-2: map[cpu:4 ephemeral-storage:224277137028 github.com/fuse:5k memory:3883332Ki pods:110]
jam-1: map[cpu:4 ephemeral-storage:111984762997 github.com/fuse:5k memory:3883332Ki pods:110]
jolly: map[cpu:4 ephemeral-storage:170873316014 github.com/fuse:5k gpu.intel.com/i915:1 hugepages-1Gi:0 hugepages-2Mi:0 memory:16208280Ki pods:110]
The Fuse device can then be made available to a container by specifying a
resource limit:
apiVersion: v1
kind: Pod
metadata:
  name: fuse-example
spec:
  containers:
  - name: main
    image: alpine
    command: ["ls", "-l", "/dev"]
    resources:
      limits:
        github.com/fuse: 1
If you look at the logs of this POD you will see something like that:
$ kubectl logs fuse-example
total 0
lrwxrwxrwx    1 root     root            11 Sep 15 08:31 core -> /proc/kcore
lrwxrwxrwx    1 root     root            13 Sep 15 08:31 fd -> /proc/self/fd
crw-rw-rw-    1 root     root        1,   7 Sep 15 08:31 full
crw-rw-rw-    1 root     root       10, 229 Sep 15 08:31 fuse
drwxrwxrwt    2 root     root            40 Sep 15 08:31 mqueue
crw-rw-rw-    1 root     root        1,   3 Sep 15 08:31 null
lrwxrwxrwx    1 root     root             8 Sep 15 08:31 ptmx -> pts/ptmx
drwxr-xr-x    2 root     root             0 Sep 15 08:31 pts
crw-rw-rw-    1 root     root        1,   8 Sep 15 08:31 random
drwxrwxrwt    2 root     root            40 Sep 15 08:31 shm
lrwxrwxrwx    1 root     root            15 Sep 15 08:31 stderr -> /proc/self/fd/2
lrwxrwxrwx    1 root     root            15 Sep 15 08:31 stdin -> /proc/self/fd/0
lrwxrwxrwx    1 root     root            15 Sep 15 08:31 stdout -> /proc/self/fd/1
-rw-rw-rw-    1 root     root             0 Sep 15 08:31 termination-log
crw-rw-rw-    1 root     root        5,   0 Sep 15 08:31 tty
crw-rw-rw-    1 root     root        1,   9 Sep 15 08:31 urandom
crw-rw-rw-    1 root     root        1,   5 Sep 15 08:31 zero
Now that this problem is solved we can move to the next one. 😉
Obtaining the source code of our image
The source code of the “container image to be built” must be made available
to the containerized buildah.
As many people do, I keep all my container definitions versioned
inside of Git repositories. I had to find a way to clone the Git repository
holding the definition of the “container image to be built” inside of the
container running buildah.
I decided to settle for this POD layout:
- The main container of the POD is going to be the one running buildah.
- The POD will have a Kubernetes init container
that will
git clone the source code of the “container image to be built”
before the main container is started.
The contents produced by the git clone must be placed into a
directory that can be accessed later on by the main container.
I decided to use a Kubernetes volume of type emptyDir
to create a shared storage between the init and the main containers.
The emptyDir volume is just perfect: it doesn’t need any fancy Kubernetes
Storage Class and it will automatically vanish once the build is done.
To checkout the Git repository I decided to settle on the official
Kubernetes git-sync container.
Quoting its documentation:
git-sync is a simple command that pulls a git repository into a local directory. It is a perfect “sidecar” container in Kubernetes - it can periodically pull files down from a repository so that an application can consume them.
git-sync can pull one time, or on a regular interval. It can pull from the HEAD of a branch, from a git tag, or from a specific git hash. It will only re-pull if the target of the run has changed in the upstream repository. When it re-pulls, it updates the destination directory atomically. In order to do this, it uses a git worktree in a subdirectory of the –root and flips a symlink.
git-sync can pull over HTTP(S) (with authentication or not) or SSH.
This is just what I was looking for.
I will start git-sync with the following parameters:
--one-time: this is needed to make git-sync exit once the checkout is done;
otherwise it will keep running forever and it will periodically look for new
commits inside of the repository. I don’t need that, plus this would cause
the main container to wait indefinitely for the init container to exit.--depth 1: this is done to limit the checkout to the latest commit. I’m not
interested in the history of the repository. This will make the checkout faster
and use less bandwidth and disk space.--repo <my-repo: the repo I want to checkout.--branch <my-branch>: the branch to checkout.
The git-sync container image was already built for multiple architectures, but
unfortunately it turned out
the non x86_64 images were broken.
The issue has been recently solved with the v3.1.7.
While waiting for the issue to be fixed I just rebuilt the container image on
the Open Build Service. This is no longer needed, everybody can just use the
official image.
Trying the first build
It’s now time to perform a simple test run. We will define a simple
Kubernetes POD that will:
- Checkout the source code of a simple container image
- Build the container iamge using
buildah
This is the POD definition:
apiVersion: v1
kind: Pod
metadata:
  name: builder-amd64
spec:
  nodeSelector:
    kubernetes.io/arch: "amd64"
  initContainers:
  - name: git-sync
    image: k8s.gcr.io/git-sync/git-sync:v3.1.7
    args: [
      "--one-time",
      "--depth", "1",
      "--dest", "checkout",
      "--repo", "https://github.com/flavio/guestbook-go.git",
      "--branch", "master"]
    volumeMounts:
      - name: code
        mountPath: /tmp/git
  volumes:
  - name: code
    emptyDir:
      medium: Memory
  containers:
  - name: main
    image: registry.opensuse.org/home/flavio_castelli/containers/containers/buildahimage:latest
    command: ["/bin/sh"]
    args: ["-c", "cd code; cd $(readlink checkout); buildah bud -t guestbook ."]
    volumeMounts:
      - name: code
        mountPath: /code
    resources:
      limits:
        github.com/fuse: 1
Let’s break it down into pieces.
Determine image architecture
The POD uses a Kubernetes node selector
to ensure the build happens on a node with the x86_64 architecture. By doing
that we will know the architecture of the final image.
Checkout the source code
As said earlier, the Git repository is checked out using an init container:
  initContainers:
  - name: git-sync
    image: k8s.gcr.io/git-sync/git-sync:v3.1.7
    args: [
      "--one-time",
      "--depth", "1",
      "--dest", "checkout",
      "--repo", "https://github.com/flavio/guestbook-go.git",
      "--branch", "master"]
    volumeMounts:
      - name: code
        mountPath: /tmp/git
The Git repository and the branch are currently hard-coded into the POD
definition, this is going to be fixed later on. Right now that’s good
enough to see if things are working (spoiler alert: they won’t 😅).
The git-sync container will run before the main container and it will write
the source code of the “container image to be built” inside of a Kubernetes
volume named code.
This is how the volume will look like after git-sync has ran:
$ ls -lh <root of the volume>
drwxr-xr-x 9 65533 65533 300 Sep 15 09:41 .git
lrwxrwxrwx 1 65533 65533  44 Sep 15 09:41 checkout -> rev-155a69b7f81d5b010c5468a2edfbe9228b758d64
drwxr-xr-x 6 65533 65533 280 Sep 15 09:41 rev-155a69b7f81d5b010c5468a2edfbe9228b758d64
The source code is stored under the rev-<git commit ID> directory. There’s
a symlink named checkout that points to it. As you will see later, this will
lead to a small twist.
Shared volume
The source code of our application is stored inside of a Kubernetes volume of
type emptyDir:
  volumes:
  - name: code
    emptyDir:
      medium: Memory
I’ve also instructed Kubernetes to store the volume in memory. Behind the scene
Kubelet will use tmpfs to do that.
The buildah container
The POD will have just one container running inside of it. This is called main
and its only purpose is to run buildah.
This is the definition of the container:
  containers:
  - name: main
    image: registry.opensuse.org/home/flavio_castelli/containers/containers/buildahimage:latest
    command: ["/bin/sh"]
    args: ["-c", "cd /code; cd $(readlink checkout); buildah bud -t guestbook ."]
    volumeMounts:
      - name: code
        mountPath: /code
    resources:
      limits:
        github.com/fuse: 1
As expected the container is mounting the code Kubenetes volume too. Moreover,
the container is requesting one resource of type github.com/fuse; as explained
above this is needed to make /dev/fuse available inside of the container.
The container executes a simple bash script. The oneliner can be expanded
to that:
cd /code
cd $(readlink checkout)
buildah bud -t guestbook .
There’s one interesting detail in there. As you can see I’m not “cd-ing” straight
into /code/checkout, instead I’m moving into /code and then resolving
the actual target of the checkout symlink.
We can’t move straight into /code/checkout because that would give us an
error:
builder:/ # cd /code/checkout
bash: cd: /code/checkout: Permission denied
This happens because /proc/sys/fs/protected_symlinks is turned on by default.
As you can read here, this
is a way to protect from specific type of exploits. Not even root inside of the
container can jump straight into /code/checkout, this is why I’m doing this
workaround.
One last note, as you have probably noticed, buildah is just building the
container image, it’s not pushing it to any registry. We don’t care about
that right now.
An unexpected problem
Our journey is not over yet, there’s one last challenge ahead of us.
Before digging into the issue, let me provide some background. My local cluster
was initially made by one x86_64 node running openSUSE Leap 15.2 and by two
ARM64 nodes running the beta ARM64 build
of Rasperry Pi OS (formerly known as raspbian).
I used the POD definition shown above to define two PODs:
builder-amd64: the nodeSelector constraint targets the amd64 architecturebuilder-arm64: the nodeSelector constraint targets the arm64 architecture
That lead to an interesting finding: the builds on ARM64 nodes worked fine, while
all the builds on the x86_64 node failed.
The failure was always the same and happened straight at the beginning of the
process:
$ kubectl logs -f builder-amd64
mount /var/lib/containers/storage/overlay:/var/lib/containers/storage/overlay, flags: 0x1000: permission denied
level=error msg="exit status 125"
To me, that immediately smelled like a security feature blocking buildah.
Finding the offending security check
I needed something faster then kubectl to iterate over this problem.
Luckily I was able to reproduce the same error while running buildah locally
using podman:
$ sudo podman run \
    --rm \
    --device /dev/fuse \
    -v <path-to-container-image-sources>:/code \
    registry.opensuse.org/home/flavio_castelli/containers/containers/buildahimage:latest \
    /bin/sh -c "cd /code; buildah bud -t foo ."
I was pretty sure the failure happened due to some tight security check. To
prove my theory I ran the same container in
privileged mode:
$ sudo podman run \
    --rm \
    --device /dev/fuse \
    --privileged \
    -v <path-to-container-image-sources>:/code \
    registry.opensuse.org/home/flavio_castelli/containers/containers/buildahimage:latest \
    /bin/sh -c "cd /code; buildah bud -t foo ."
The build completed successfully. Running a container in privileged mode is bad
and makes me hurt, it’s not a long term solution but at least that proved the
build failure was definitely caused by some security constraint.
The next step was to identify the security measure at the origin of the failure.
That could be either something related with seccomp or AppArmor. I immediately
ruled out SELinux as the root cause because it’s not used on openSUSE by default.
I then ran the container again, but this time I instructed podman to not apply
any kind of seccomp profile; I basically disabled seccomp for my containerized
workload.
This can be done by using the unconfined mode for seccomp:
$ sudo podman run \
    --rm \
    --device /dev/fuse \
    -v <path-to-container-image-sources>:/code \
    --security-opt=seccomp=unconfined \
    registry.opensuse.org/home/flavio_castelli/containers/containers/buildahimage:latest \
    /bin/sh -c "cd /code; buildah bud -t foo ."
The build failed again with the same error. That meant seccomp was not causing
the failure. AppArmor was left as the main suspect.
Next, I just run the container but I instructed podman to not apply any kind
of AppArmor profile; again, I basically disabled AppArmor for my containerized
workload.
This can be done by using the unconfined mode for AppArmor:
$ sudo podman run \
    --rm \
    --device /dev/fuse \
    -v <path-to-container-image-sources>:/code \
    --security-opt=apparmor=unconfined \
    registry.opensuse.org/home/flavio_castelli/containers/containers/buildahimage:latest \
    /bin/sh -c "cd /code; buildah bud -t foo ."
This time the build completed successfully. Hence the issue was caused by the
default AppArmor profile.
Create an AppArmor profile for buildah
All the container engines (docker, podman, CRI-O, containerd) have an
AppArmor profile that is applied to all the containerized workloads by default.
The containerized Buildah is probably doing something that is not allowed by
this generic profile. I just had to identify the offending operation and create
a new tailor-made AppArmor profile for buildah.
As a first step I had to obtain the default AppArmor profile. This is not as easy
as it might seem. The profile is generated at runtime by all the container
engines and is loaded into the kernel. Unfortunately there’s no way to dump
the information stored into the kernel and have a human-readable AppArmor profile.
After some digging into the source code of podman and some reading on docker’s
GitHub issues, I produced a quick PR
that allowed me to print the default AppArmor profile on to the stdout.
This is the default AppArmor profile used by podman:
#include <tunables/global>


profile default flags=(attach_disconnected,mediate_deleted) {

  #include <abstractions/base>


  network,
  capability,
  file,
  umount,


  # Allow signals from privileged profiles and from within the same profile
  signal (receive) peer=unconfined,
  signal (send,receive) peer=default,


  deny @{PROC}/* w,   # deny write for all files directly in /proc (not in a subdir)
  # deny write to files not in /proc/<number>/** or /proc/sys/**
  deny @{PROC}/{[^1-9],[^1-9][^0-9],[^1-9s][^0-9y][^0-9s],[^1-9][^0-9][^0-9][^0-9]*}/** w,
  deny @{PROC}/sys/[^k]** w,  # deny /proc/sys except /proc/sys/k* (effectively /proc/sys/kernel)
  deny @{PROC}/sys/kernel/{?,??,[^s][^h][^m]**} w,  # deny everything except shm* in /proc/sys/kernel/
  deny @{PROC}/sysrq-trigger rwklx,
  deny @{PROC}/kcore rwklx,

  deny mount,

  deny /sys/[^f]*/** wklx,
  deny /sys/f[^s]*/** wklx,
  deny /sys/fs/[^c]*/** wklx,
  deny /sys/fs/c[^g]*/** wklx,
  deny /sys/fs/cg[^r]*/** wklx,
  deny /sys/firmware/** rwklx,
  deny /sys/kernel/security/** rwklx,


  # suppress ptrace denials when using using 'ps' inside a container
  ptrace (trace,read) peer=default,

}
A small parenthesis, this AppArmor profile is the same generated by all the other
container engines. Some poor folks keep this file in sync manually, but there’s a
discussion upstream
to better organize things.
Back to the build failure caused by AppArmor… I saved the default profile into
a text file named containerized_buildah and I changed this line
profile default flags=(attach_disconnected,mediate_deleted) {
to look like that:
profile containerized_buildah flags=(attach_disconnected,mediate_deleted,complain) {
This changes the name of the profile and, most important of all, changes the policy mode
to be of type complain instead of enforcement.
Quoting the AppArmor man page:
- enforcement - Profiles loaded in enforcement mode will result in enforcement of the policy defined in the profile as well as reporting policy violation attempts to syslogd.
- complain - Profiles loaded in “complain” mode will not enforce policy. Instead, it will report policy violation attempts. This mode is convenient for developing profiles.
I then loaded the policy by doing:
$ sudo apparmor_parser -r containerized_buildah
Invoking the aa-status command reports a list of all the modules loaded,
their policy mode and all the processes confined by AppArmor.
$ sudo aa-status
...
2 profiles are in complain mode.
   containerized_buildah
...
One last operation had to done before I could start to debug
the containerized buildah: turn off “audit quieting”. Again, straight
from AppArmor’s man page:
Turn off deny audit quieting
By default, operations that trigger “deny” rules are not logged. This is called deny audit quieting.
To turn off deny audit quieting, run:
echo -n noquiet >/sys/module/apparmor/parameters/audit
Before starting the container, I opened a new terminal to execute this process:
# tail -f /var/log/audit/audit.log | tee apparmor-build.log
On systems where auditd is running (like mine), all the AppArmor logs are sent
to /var/log/audit/audit.log. This command allowed me to keep an eye open on
the live stream of audit logs and save them into a smaller file named
apparmor-build.log.
Finally, I started the container using the custom AppArmor profile shown above:
$ sudo podman run \
    --rm \
    --device /dev/fuse \
    -v <path-to-container-image-sources>:/code \
    --security-opt=apparmor=containerized_buildah \
    registry.opensuse.org/home/flavio_castelli/containers/containers/buildahimage:latest \
    /bin/sh -c "cd /code; buildah bud -t foo ."
The build completed successfully. Grepping for ALLOWED inside of the audit file
returned a stream of entries like the following ones:
type=AVC msg=audit(1600172410.567:622): apparmor="ALLOWED" operation="mount" info="failed mntpnt match" error=-13 profile="containerized_buildah" name="/tmp/containers.o5iLtx" pid=25607 comm="exe" srcname="/usr/bin/buildah" flags="rw, bind"
type=AVC msg=audit(1600172410.567:623): apparmor="ALLOWED" operation="mount" info="failed mntpnt match" error=-13 profile="containerized_buildah" name="/tmp/containers.o5iLtx" pid=25607 comm="exe" flags="ro, remount, bind"
type=AVC msg=audit(1600172423.511:624): apparmor="ALLOWED" operation="mount" info="failed mntpnt match" error=-13 profile="containerized_buildah" name="/" pid=25629 comm="exe" flags="rw, rprivate"
...
As you can see all these entries are about mount operations, with mount
being invoked with quite an assortment of flags.
The default AppArmor profile explicitly denies mount operations:
...
  deny mount,
...
All I had to do was to change the containerized_buildah AppArmor profile to
that:
#include <tunables/global>


profile containerized_buildah flags=(attach_disconnected,mediate_deleted) {

  #include <abstractions/base>


  network,
  capability,
  file,
  umount,
  mount,

  # Allow signals from privileged profiles and from within the same profile
  signal (receive) peer=unconfined,
  signal (send,receive) peer=default,


  deny @{PROC}/* w,   # deny write for all files directly in /proc (not in a subdir)
  # deny write to files not in /proc/<number>/** or /proc/sys/**
  deny @{PROC}/{[^1-9],[^1-9][^0-9],[^1-9s][^0-9y][^0-9s],[^1-9][^0-9][^0-9][^0-9]*}/** w,
  deny @{PROC}/sys/[^k]** w,  # deny /proc/sys except /proc/sys/k* (effectively /proc/sys/kernel)
  deny @{PROC}/sys/kernel/{?,??,[^s][^h][^m]**} w,  # deny everything except shm* in /proc/sys/kernel/
  deny @{PROC}/sysrq-trigger rwklx,
  deny @{PROC}/kcore rwklx,

  deny /sys/[^f]*/** wklx,
  deny /sys/f[^s]*/** wklx,
  deny /sys/fs/[^c]*/** wklx,
  deny /sys/fs/c[^g]*/** wklx,
  deny /sys/fs/cg[^r]*/** wklx,
  deny /sys/firmware/** rwklx,
  deny /sys/kernel/security/** rwklx,


  # suppress ptrace denials when using using 'ps' inside a container
  ptrace (trace,read) peer=default,

}
The profile is now back to enforcement mode and, most important of all, it
allows any kind of mount invocation.
I tried to be more granular and allow only the mount flags
actually used by buildah, but the list was too long, there were too many
combinations and that seemed pretty fragile. The last thing I want to happen is
to have AppArmor break buildah in the future if a slightly different mount
operation is done.
Reloading the AppArmor profile via sudo apparmor_parser -r containerized_buildah
and restarting the build proved that the profile was doing its job also in
enforcement mode: the build successfully completed. 🎉🎉🎉
But the journey over yet, not quite…
Why AppArmor is blocking only x86_64 builds?
Once I figured out the root cause of x86_64 builds there was one last mystery
to be solved: why the ARM64 builds worked just fine? Why didn’t AppArmor cause
any issue over there?
The answer was quite simple (and a bit shocking to me): it turned out the
Raspberry Pi OS (formerly known as raspbian) ships a kernel that doesn’t have
AppArmor enabled. I never realized that!
I didn’t find the idea of running containers without any form of
Mandatory Access Control
particularly thrilling. Hence I decided to change the operating system run on
my Raspberry Pi nodes.
I initially picked Raspberry Pi OS because I wanted to have my Raspberry Pi 4
boot straight from an external USB disk instead of the internal memory card.
At the time of writing, this feature requires a bleeding edge firmware and all
the documentation points at Raspberry Pi OS. I just wanted to stick with
what the community was using to reduce my chances of failure…
However, if you need AppArmor support, you’re left with two options:
openSUSE and Ubuntu.
I installed openSUSE Leap 15.2 for aarch64 (aka ARM64) on one of my Raspberry
Pi 4. The process of getting it to boot from USB was pretty straightforward.
I added the node back into the Kubernetes cluster, forced
some workloads to move on top of it and monitored its behaviour.
Everything was great, I was ready to put openSUSE on my 2nd Raspberry Pi 4 when
I noticed something strange: my room was quieter than the usual…
My Raspberry Pis are powered using the official PoE HAT.
I love this hat, but I hate its built-in fan because it’s notoriously
loud (yes, you can tune its thresholds, but it’s still damn noisy when it kicks
in).
Well, my room was suddenly quieter because the fan of the PoE HAT was
not spinning at all. That lead the CPU temperature to reach more than 85 °C 😱
It turns out the PoE HAT needs a driver which is not part of the mainstream
kernel and unfortunately nobody added it to the openSUSE kernel yet.
That means openSUSE doesn’t see and doesn’t even turn on the PoE HAT fan (not
even at full speed).
I filed a enhancement bug report against openSUSE Tumbleweed to get the PoE HAT
driver added to our kernel and moved over to Ubuntu. Unfortunately that was
a blocking issue for me. What a pity 😢
On the other hand, the kernel of Ubuntu Server supports both the PoE HAT fan and
AppArmor. After some testing I switched all my Raspberry Pi nodes to run
Ubuntu 20.04 Server.
To prove my mental sanity, I ran the builder-arm64 POD against the Ubuntu
nodes using the default AppArmor profile. The build failed on ARM64 in the same
way as it did on x86_64. What a relief 😅.
Kubernetes and AppArmor profiles
At this point I’ve a tailor-made AppArmor profile for buildah, plus all the nodes
of my cluster have AppArmor support. It’s time to put all the pieces together!
The previous POD definition has to be extended to ensure the main container
running buildah is using the tailor-made AppArmor profile instead of the
default one.
Kubernetes’ AppArmor
support is a bit primitive, but effective. The only requirement, when using
custom profiles, is to ensure the profile is already known by the AppArmor
system on each node of the cluster.
This can be done in an easy way: just copy the profile under
/etc/apparmor.d and perform a systemct reload apparmor. This has to be done
once, at the next boot the AppArmor service will automatically load all
the profiles found inside of /etc/apparmor.d.
This is how the final POD definition looks like:
apiVersion: v1
kind: Pod
metadata:
  name: builder-amd64
  annotations:
    container.apparmor.security.beta.kubernetes.io/main: localhost/containerized_buildah
spec:
  nodeSelector:
    kubernetes.io/arch: "amd64"
  containers:
  - name: main
    image: registry.opensuse.org/home/flavio_castelli/containers/containers/buildahimage:latest
    command: ["/bin/sh"]
    args: ["-c", "cd code; cd $(readlink checkout); buildah bud -t guestbook ."]
    volumeMounts:
      - name: code
        mountPath: /code
    resources:
      limits:
        github.com/fuse: 1
  initContainers:
  - name: git-sync
    image: k8s.gcr.io/git-sync/git-sync:v3.1.7
    args: [
      "--one-time",
      "--depth", "1",
      "--dest", "checkout",
      "--repo", "https://github.com/flavio/guestbook-go.git",
      "--branch", "master"]
    volumeMounts:
      - name: code
        mountPath: /tmp/git
  volumes:
  - name: code
    emptyDir:
      medium: Memory
This time the build will work fine also inside of Kubernetes, regardless of the
node architecture! 🥳
What’s next?
First of all, congratulations for having made up to this point. It has been quite
a long journey, I hope you enjoyed it.
The next step consists of taking this foundation (a Kubernetes POD that can
run buildah to build new container images) and find a way to orchestrate that.
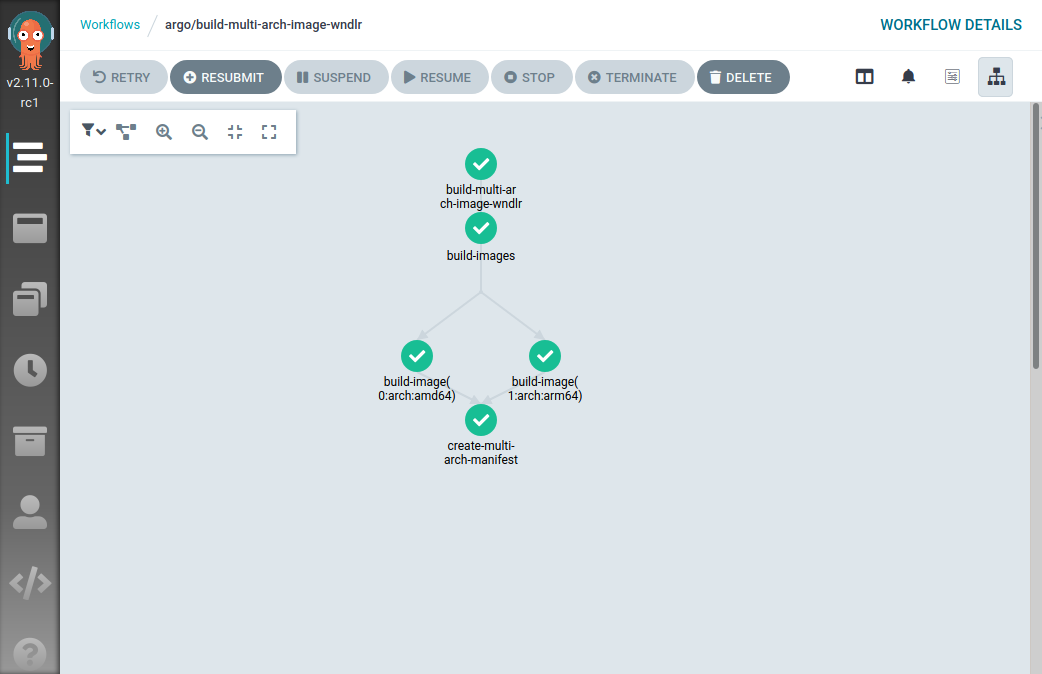
What I’ll show you in the next blog post is how to create a workflow that, given
a GitHub repository with a Dockerfile, builds two container images (amd64 and
arm64), pushes both of them to a container registry and then creates
a multi-architecture manifest referencing them.
As always feedback is welcome, see you soon!
]]>